Take me back to Advanced Pyrotechnician Training
Basic Theory of Operation
How does the Pyrodigital system work?
The PD system is essentially a computer used for one task, to shoot fireworks. Since it is dedicated to a single function, it does that single function very well. The system reads an internal data table (your show script) and gives the appropriate address a fire command when the time on the show clock matches a time specified in the data table.
There are only 3 wires in an XLR cable, so how does fire thousands of individual cues?
The system is issuing a serial data command that all the modules see, not just one module at a time. It is the responsibility of each Field Module (FM) to read the serial data and decide if its own address matches the address just received. If its address matches the one just received, then it reads the particular cue that needs to be fired from the serial data stream and hits it with an electrical pulse.


How do you program when each shot will fire?
This is done through software on a PC long before you start your setup in the field. A show producer will script the show ahead of time, and download it to the FC. Technically, you could program each shot one at a time into the controller by using the keypad on the FC, but this is not practical for a typical-size show due to the amount of time it would take. The keypad and editing functions on the FC are used mainly for making slight modifications to a script such as changing a shot address, shot time, or inserting new shots if necessary. These functions are shown in detail in our section on Using the Field Controller.
How is Pyrodigital’s time formatted?
The Pyrodigital system uses hours, minutes, seconds, and frames (00:00:00:00). Hours, minutes, and seconds are self-explanatory. There are 30 frames per second (this is standard for video). In other words, each second is divided into 30 segments. So in a script, a particular shot time might be 00:03:21:17, which means that the shot will fire at 0 hours, 3 minutes, 21 seconds, and 17 frames on the show clock.
Pre-Fire Delay
In addition to shot time and address, the data table also uses Pre-Fire Delay (PFD) to determine when it will actually fire a shot. In reality, shot time is really “Event Time”. Event time is the time the “event” will happen. For example, it is the time in which the show producer wanted a 6″ shell to break, Each shell has a certain “lift” time. Lift time is defined as the time the shell was fired to the time the shell breaks at apogee. So for example, if we know that a particular 6″ shell has a lift time of 5.2 seconds, we will program a PFD of 5.2 seconds for that shot. The FC will now shoot that shell 5.2 seconds before its “event time” in the data table.


Pyrodigital Layout
Most Pyrodigital setups follow the basic structure in the adjacent diagram. If you have an aerial setup, you will typically group your racks such that there are 15 mortars per group (each Pyrodigital field module has 16 cues, and each rack typically comes with 5 mortars, leaving 1 cue empty on each module). This also acts to give you a spare terminal if there are issues with any of the terminals on that particular field module (FM). Once your racks are cleated into their appropriate groups, an FM is secured to each group by screwing it into one of the racks in that group.
Each addressed device is then loaded and wired into the attached field module. When running the XLR line from FM to FM and back to the field controller and remembering the “female has the power,” you need to make sure you run your XLR line from FM to FM in a fashion that is consistent with the female end coming from the power source, in this case, the field controller. Otherwise, you will have to re-wire your cabling when you realize you did it backward.
Your main splitter should be as close to the field controller as possible in case you need to debug an issue such as a short during the display. This will allow the person assigned to the splitter to be away from the fireworks during the debugging process.
Pyrodigital Setup
Safety First! Prior to wiring in any electric matches to your Pyrodigital Field Modules (FMs), ensure that each has its Shunt/Arm switch set to “SHUNT.”
Pyrodigital Maps & Cue Sheets

FM Addressing, Arming, & Shunting

Pyrodigital FM Wiring

Pyrodigital FM XLR Connections

XLR Cable Coiling

Using a Pyrodigital XLR Splitter

Auto-Fire Mode
Autofire mode allows you to exploit the unique possibilities of using a computer to fire a show. It can fire shots with extreme precision and speed, synchronized to music. It can fire consecutive shots much faster than someone using a pinboard type of firing system to achieve spectacular comet chaser effects, among other precise hits to a soundtrack.
Internal Clock Mode
The Pyrodigtial (PD) system has an accurate internal clock that it can shoot your pre-programmed script to. This is typically used when the distances or logistics do not allow for a time code signal to be sent. In order to sync up the PD field controller to a musical soundtrack to which the show was scripted, certain steps must be taken. First off a “Pre-Roll”, typically one minute worth, must be incorporated into the soundtrack. A pre-roll is defined as a short segment on the music soundtrack in which there is no show music. In other words, the show music (and fireworks cues in the data table) do not start until one minute into the CD. So your first cue in the script will shoot at 00:01:00:00 instead of at zero. This pre-roll allows for the operator and audio technician to match the time on the CD to the internal clock of the computer via voice communications, over a radio or cell phone. This is shown in the training video below.
Time Code
There are a few different types of time code that the Pyrodigital system accepts, such as SMPTE (Society of Motion Picture and Television Engineers) time code which is the standard in the entertainment industry, and a unique Pyrodigital Frequency Shift Keying (PD FSK) time code. We shall mainly concentrate on PD FSK, since that is most commonly used at a public display. This time code is unique in the sense that the computer can sync up at any point in the soundtrack without having to be restarted or offset. This is due to each “time” having a unique code. If you are receiving poor quality time code with a lot of errors, you will notice the display says “sync find.” This means it sees the time code coming through, but it can’t read the noisy signal. During this time the FC is firing off of its internal clock. If for some reason the FC loses sync during the show, or the time code gets cut off completely, the FC will automatically switch to “internal drive” and will be firing from its internal clock. If you get the time code signal back somewhere later on in the show, the computer will re-sync to the time code. One of the training videos below shows how to check the quality of the time code you are receiving.


Manual Fire Mode
Why Manually Fire with a Computer?
When shooting for a larger event, you might have multiple times throughout there event where pyro must be shot. For example, a major sporting event. National Anthem, Player Intro, and main post-game display. You will have different data tables in your Field Controller (FC) for your different “shows” throughout the day. Your main post-game display would be shot auto-fire, most likely to a soundtrack being played inside the stadium. But what about the anthem? Everyone sings (or plays) the anthem at a different tempo (speed). How can you pre-script (shot times) to a live performance? In most cases, you can’t. So you fire the anthem cues manually, one shot at a time with the use of a trigger (seen to the right) or by pressing the fire button on the field controller. The computer also allows us to fire shots from multiple positions with one pull of the trigger.
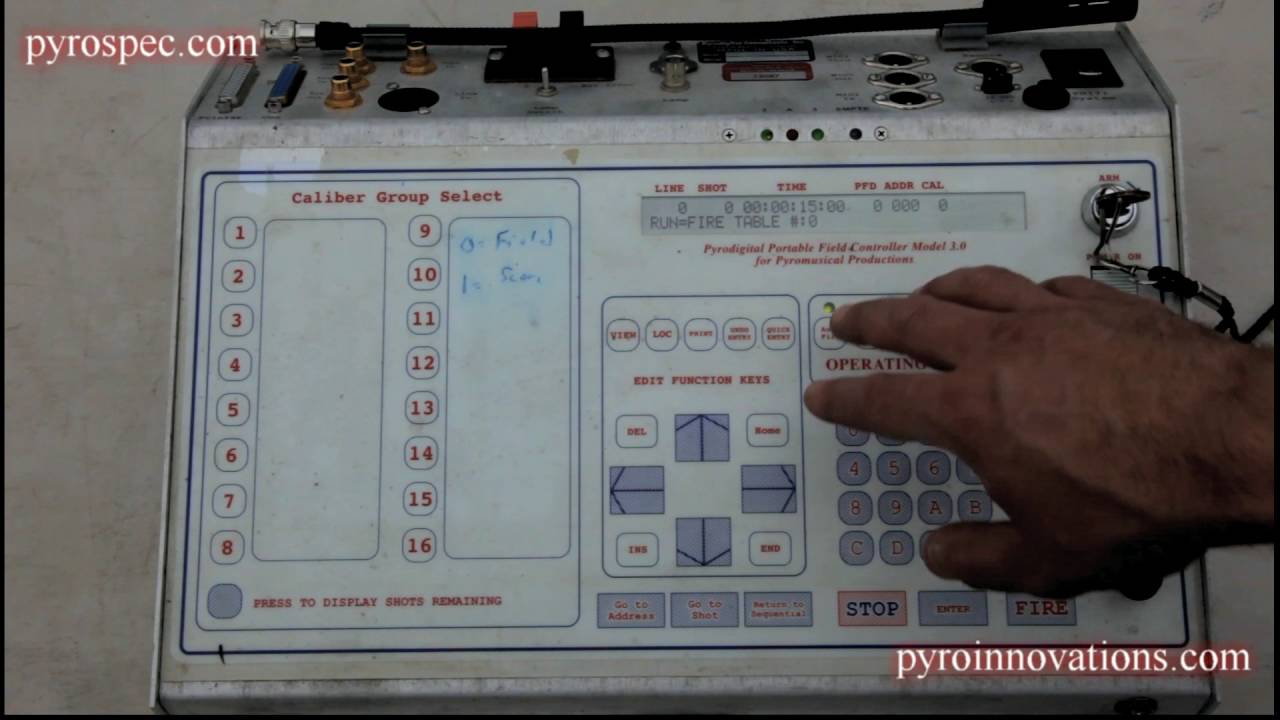
Caliber Group Select
Contrary to autofire mode, if you assign a caliber to a shot when shooting in manual mode, they will be organized into caliber groups. For example, if we had manually fired pyro segments during the national anthem and player intros for a baseball game, we could assign a caliber of “1” to the anthem shots and a caliber of “2” to the player intro shots. Now you can select a particular group of shots without worrying that you will overshoot into another segment. The field controller will display how many shots you have left in that caliber group when in this mode and not allow you to fire anything else until you enter a different caliber group.

AutoFire with Timecode

Internal Clock Manual Sync-up
Timecode Quality Check


Checking Status (continuity)
The check status feature provides a continuity check. There are three different modes to check status with, Manual, Semi-Auto, and Auto. We cover semi-auto, and auto in the training video. Regardless of which continuity mode you are in, they will each display a certain character next to each cue to indicate its status. Here are the symbols and their meaning:
What You Want to See
Equal Sign (=) – Means there is SOMETHING in the data table for that cue, and it “sees” something at the FM. (good continuity)
Blank Space ( ) – Means there is NOTHING in the data table for that cue, and it does NOT “see” anything at the FM.
Indication of a Problem
Question Mark (?) – Means there is NOTHING in the data table for that address, but it “sees” something at the FM. (this shot should not be there and will NOT be fired by the FC).
Letter X (X) – Means there is SOMETHING in the data table for that cue, but it does NOT “see” it at the FM. (bad continuity)
Change an Address
Remember, the data table is your show script. Don’t mess with it unless you have to and make sure you know what your doing. We cover two different functions of data table manipulation in the training video, table select and table edit.
Table Select
Table select does exactly that. It selects a table. The PD Field Controller (FC) can store multiple data tables, and it is typical to have two identical tables for your show as a backup in case one becomes corrupted.
Table Edit
Table edit allows you to edit all items of each shot within the table. Included are the shot #, line #, address, pre-fire time, and caliber.


Debugging a Short
A short can occur in a variety of places. The most common is in one of the field modules or the XLR cable, but can also happen in the field controller. If it occurs during status, you can take your time systematically tracing out the problem component. If it happens during the show it’s not very practical to fix.
You must approach a short systematically. If you follow the layout style shown above, then you will have a main splitter which the rest of the show branches out from near your field controller. As soon as the short occurs, you instruct the member of your crew you assigned to this position to begin unplugging one branch at a time to see if the “short” indicator light on the FC goes out. If not, he plugs that line back into the splitter and removes the second. Let’s assume that the short light goes out when the second cable is pulled, now you know the short is somewhere down that branch. If during the show, this is likely where you stop and you continue firing without that branch. If during status, the next step would be to plug that cable back in and follow it to the next point. Continue methodically going down the branch, unplugging one at a time, in order, to check each time to see if the short light goes out on the FC. When it does, you know that you have found the shorted field module (or cable) and can swap out that FM or cable.
Pyrodigital Zipper Fire
Zipper fire allows “simultaneous” firing from different addresses on different modules. Each event line in a zipper fire must have the same time and a pre-fire time of zero. Watch the training video for a detailed explanation.
